2008-07-23
운영자 (1)
포인트 : 0 게시물 작성수 : 0 댓글 작성수 :
워드프레스 사이트 백업/복원/이전 방법
작성자: 알렉스
조회: 2943 등록일: 2018-05-10
워드프레스 사이트 [백업, 복원, 이전] 방법
워드프레스로 사이트를 만들어 운영하다 보면 다양한 이유로 사이트를 이전 해야 하는 경우가 생깁니다. 또한, 갑자기 홈페이지에 문제가 발생하거나 DDoS 공격 등의 사이트 공격으로 피해를 볼 수 있으므로 워드프레스 백업과 복원 하는 방법은 반드시 숙지하고 있어야 합니다.
이미 다양한 '워드프레스 사이트 백업, 복원 이전 플러그인'이 출시되어 있지만, 많은 사용자들이 추천하고 있고 저 역시도 만족스럽게 사용하고 있는 'All-in-One WP Migration' 플러그인을 통해 사이트 이전 작업을 진행 해보도록 하겠습니다.
워드프레스 사이트 [백업, 복원, 이전] 방법
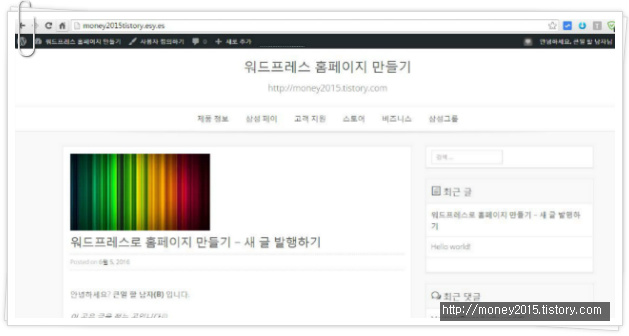
1. 이해를 돕기 위해 워드프레스 홈페이지 만들기 강좌에서 만들었던 사이트를 이용해
워드프레스 사이트 이전을 직접 해보도록 하겠습니다.
2. 사이트를 이전받을 새로운 워드프레스 사이트를 하나 개설 했습니다.
도메인 주소는 http://money2015tistory.eye.es 입니다.
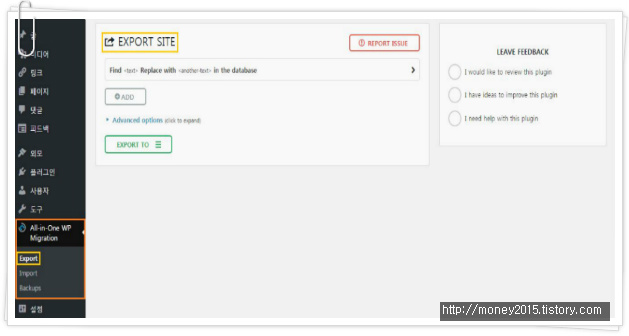
3. 기존 워드프레스 사이트에 'All-in-One WP Migration' 플러그인 을 설치하고 활성화 시킵니다.
4. 메뉴에 추가된 All-in-One WP Migration을 열어 Export 를 클릭합니다.
5. Export 는 현재 사이트를 통째로 백업하는 기능으로
워드프레스 사이트 이전이나 복원을 할 때 사용 할 수 있습니다.
글과 댓글은 기본이며 플러그인 설정까지 하나도 빠뜨리지 않고 그대로 옮길 수 있습니다.
사이트 백업 파일을 저장하는 방법은 파일, FTP, 드랍박스, 구글 드라이브 등 다양한 방법이 있지만,
무료 버전에서는 FILE만 가능 하므로 EXPORT TO 를 클릭한 후 FILE 을 클릭합니다.
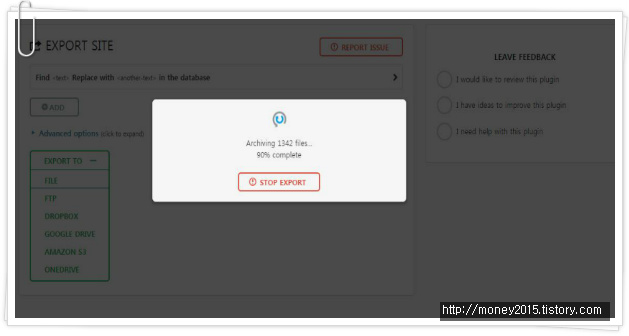
6. 위와 같이 진행 상황을 알려주는 창이 뜨며 워드프레스 사이트 백업이 진행됩니다.
7. 백업 파일이 생성되면 위 그림과 같이 파일을 다운 받을 수 있는 창이 나타납니다.
초록색의 DOWNLOAD 버튼을 클릭한 후 다운 받을 위치를 설정하고 저장 합니다.
8. 내보내기(백업 파일 생성) 작업이 완료되었으면
이전받을 워드프레스 사이트 에도 'All-in-One WP Migration' 플러그인을 설치 하고
생성된 메뉴 중에서 Import 를 클릭합니다.
9. IMPORT FROM 을 클릭한 후 FILE 을 클릭합니다.
그 후 조금 전 다운 받았던 백업 파일을 찾아 업로드 합니다.
출처: http://money2015.tistory.com/638
10. 파일 업로드가 끝나면 위 사진과 같은 알림 메시지가 나타납니다.
메시지 내용은 다음과 같습니다.
"이 불러오기 과정은 당신의 데이터 베이스, 미디어, 플러그인 그리고 테마 파일을 덮어쓰기 합니다.
CONTINUE를 누르기 전 현재 사이트의 데이터를 백업해주세요."
이전 사이트 내용을 이전해 올 것이므로 현재 사이트 백업은 불필요합니다.
그러므로 알림 메시지를 무시하고 CONTINUE 를 클릭합니다.
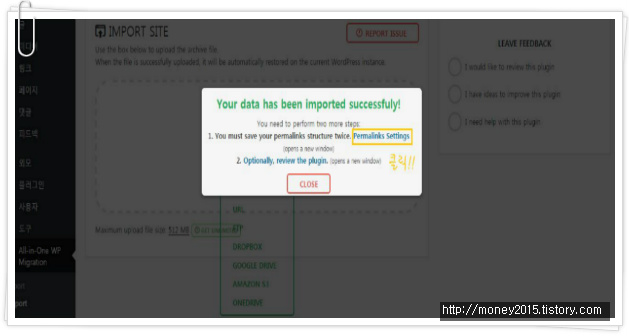
11. 이전 사이트의 데이터가 모두 옮겨지면 위와 같은 알림 메시지가 나타납니다.
메시지 내용은 다음과 같습니다.
"당신은 2가지 과정이 더 남았습니다.
1. 당신은 반드시 Permalink Structure(고유 주소)를 2번 저장 해야 합니다
2. 필요하다면 플러그인을 한 번 더 확인하세요"
2번은 굳이 할 필요가 없지만, 1번 고유주소 저장 은 반드시 해야지만 사이트를 완전히 이전시킬 수 있습니다.
그러므로 Permalinks Settings 를 클릭해 고유주소를 설정하는 페이지로 이동합니다.
이 과정에서 워드프레스에 재로그인하는 과정이 필요합니다.
12. 주의할 점은 이전 사이트의 모든 내용이 이전된 상태기 때문에
로그인할 때도 이전 사이트 에서 사용하던
아이디와 패스워드 를 사용 해야 합니다.
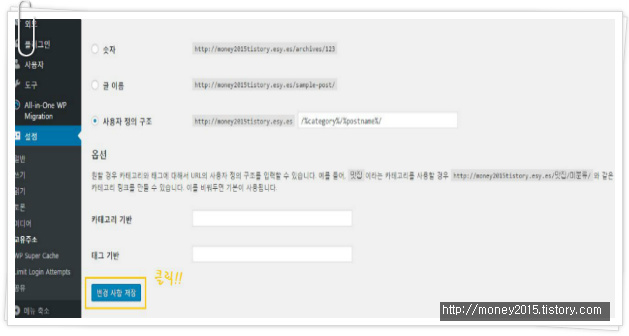
13. 로그인 후 고유주소 설정 창이 뜨면 스크롤을 내려 변경 사항 저장 을 클릭 해줍니다.
저장이 완료되면 한 번 더 변경 사항 저장 을 클릭해줍니다.
(만약 로그인 후 대시보드로 이동되었다면 메뉴-설정-고유주소 를 클릭해 이동할 수 있습니다)
14. 위 사진과 같이 오류 없이 '고유주소 구조가 업데이트되었습니다.' 라는 안내 문구가 뜨면
기존 워드프레스 사이트에서 새로운 워드프레스 사이트로의 이전이 성공적으로 끝난 것 을 뜻합니다.
혹시라도 유료 플러그인을 사용하고 있었다면 설정이 그대로 유지되어있는지 확인해보는 것을 추천합니다.
15. 사이트 이전이 끝난 후 홈페이지로 이동해 보았습니다.
모든 자료와 플러그인이 완벽히 옮겨졌고 사이트도 정상적으로 작동합니다.
- - - -
기존의 도메인을 새로 생성한 워드프레스 사이트로 옮기려면
도메인 네임주소 를 새로운 워드프레스 호스팅 서버로 설정 해준 후
관리자 메뉴-설정-일반 을 클릭해
워드프레스 주소와 사이트 주소를 재설정 해주면 됩니다.
위와 같은 방법으로 주기적으로 EXPORT 파일을 생성 해 저장해 놓으면 혹시라도 워드프레스 사이트에 문제가 생겼을때 백업 파일을 이용해 어려움 없이 즉시 복구 시킬 수 있습니다. 혹시라도 위 과정대로 진행하시다가 문제점이 생기거나 궁금한 점이 있다면 언제든 댓글 남겨주시면 성실히 답변해드리도록 하겠습니다.
출처:
http://money2015.tistory.com/638 [큰일 할 남자]
출처:
http://money2015.tistory.com/638 [큰일 할 남자]
<div class="area_title"><strong class="tit_category"><a href="http://money2015.tistory.com/category/%EB%B8%94%EB%A1%9C%EA%B7%B8%20%ED%8C%81%20%28Tips%20of%20Blog%29/%EC%9B%8C%EB%93%9C%ED%94%84%EB%A0%88%EC%8A%A4%20%28Wordpress%29"><u><font color="#0066cc">블로그 팁 (Tips of Blog)/워드프레스 (Wordpress)</font></u></a></strong> <h3 class="tit_post"><a style="color: rgb(127, 212, 255);" href="http://money2015.tistory.com/638"><u>워드프레스 사이트 [백업, 복원, 이전] 방법</u></a></h3><span class="txt_detail my_post">큰일 할 남자 <span class="txt_bar"></span>2016.07.10 18:41 </span> </div><div class="area_view"><div class="tt_article_useless_p_margin"><div style="margin: 0px 10px 10px 0px; width: 200px; height: 200px; float: left;">
<ins class="adsbygoogle" style="width: 200px; height: 200px; display: inline-block;" data-adsbygoogle-status="done" data-ad-client="ca-pub-8089307645737503" data-ad-slot="5809644670"><ins id="aswift_0_expand" style="margin: 0px; padding: 0px; border: currentColor; border-image: none; width: 200px; height: 200px; display: inline-table; visibility: visible; position: relative; background-color: transparent;"><ins id="aswift_0_anchor" style="margin: 0px; padding: 0px; border: currentColor; border-image: none; width: 200px; height: 200px; display: block; visibility: visible; position: relative; background-color: transparent;"><iframe name="aswift_0" width="200" height="200" id="aswift_0" frameborder="0" marginwidth="0" marginheight="0" scrolling="no" vspace="0" hspace="0" allowfullscreen="true" style="left: 0px; top: 0px; width: 820px; height: 819.99px; position: absolute;" allowtransparency="true"></iframe></ins></ins></ins>
</div><p style="text-align: center; display: none;">워드프레스 사이트 [백업, 복원, 이전] 방법</p><p> <b>워드프레스로 사이트를 만들어 운영하다 보면 다양한 이유로 <span style="color: rgb(152, 0, 0);">사이트를 이전</span>해야 하는 경우가 생깁니다. 또한, 갑자기 홈페이지에 문제가 발생하거나 DDoS 공격 등의 사이트 공격으로 피해를 볼 수 있으므로 <span style="color: rgb(152, 0, 0);">워드프레스 백업과 복원</span>하는 방법은 반드시 숙지하고 있어야 합니다.</b></p><p><b><br></b></p><p style="text-align: center; clear: none; float: none;"><span class="imageblock" style="width: 629px; height: auto; display: inline-block; max-width: 100%;"><img width="629" height="336" style="height: auto; max-width: 100%;" alt="워드프레스 사이트 이전하기" src="http://cfile7.uf.tistory.com/image/213173415782DCDE2C3C3C" filename="워드프레스 사이트 [백업, 복원, 이전] 방법.jpg" filemime="image/jpeg" ""="" original="yes"></span></p><p><br></p><p> 이미 다양한 '워드프레스 사이트 백업, 복원 이전 플러그인'이 출시되어 있지만, 많은 사용자들이 추천하고 있고 저 역시도 만족스럽게 사용하고 있는 <b><span style="color: rgb(152, 0, 0);">'All-in-One WP Migration'</span>플러그인을 통해<span style="color: rgb(71, 102, 0);"> 사이트 이전 작업을 진행</span>해보도록 하겠습니다.</b></p><p><br></p><p></p><hr style="border-width: 1px 0px 0px; border-style: solid none none; border-color: black; border-image: none; height: 1px; display: block;"><p></p><p><br></p><h1 style="text-align: center;"><span style="color: rgb(152, 0, 0);">워드프레스 사이트</span> <span style="color: rgb(71, 102, 0);">[백업, 복원, 이전]</span> 방법</h1><p><br></p><p style="text-align: center; clear: none; float: none;"><span class="imageblock" style="width: 629px; height: auto; display: inline-block; max-width: 100%;"><img width="629" height="336" style="height: auto; max-width: 100%;" alt="워드프레스 사이트 [백업, 복원, 이전] 방법" src="http://cfile2.uf.tistory.com/image/261E68415782AFFD305378" filename="워드프레스 사이트 [백업, 복원, 이전] 1.jpg" filemime="image/jpeg" original="yes"></span></p><p style="text-align: center; clear: none; float: none;">1. 이해를 돕기 위해 워드프레스 홈페이지 만들기 강좌에서 만들었던 사이트를 이용해</p><p style="text-align: center; clear: none; float: none;"><b>워드프레스 사이트 이전을 직접 해보도록 하겠습니다.</b></p><p style="text-align: center; clear: none; float: none;"><br></p><p style="text-align: center; clear: none; float: none;"><span class="imageblock" style="width: 629px; height: auto; display: inline-block; max-width: 100%;"><img width="629" height="336" style="height: auto; max-width: 100%;" alt="워드프레스 사이트 이전하기" src="http://cfile7.uf.tistory.com/image/241630415782B000330A93" filename="워드프레스 사이트 [백업, 복원, 이전] 2.jpg" filemime="image/jpeg" original="yes"></span></p><p style="text-align: center; clear: none; float: none;">2. 사이트를 이전받을 <b>새로운 워드프레스 사이트를 하나 개설</b>했습니다.</p><p style="text-align: center; clear: none; float: none;">도메인 주소는 http://money2015tistory.eye.es 입니다.</p><p style="text-align: center; clear: none; float: none;"><br></p><p style="text-align: center; clear: none; float: none;"><span class="imageblock" style="width: 629px; height: auto; display: inline-block; max-width: 100%;"><img width="629" height="336" style="height: auto; max-width: 100%;" alt="워드프레스 백업 플러그인" src="http://cfile21.uf.tistory.com/image/231586415782B0053163C9" filename="워드프레스 사이트 [백업, 복원, 이전] 3.jpg" filemime="image/jpeg" original="yes"></span></p><p style="text-align: center; clear: none; float: none;">3. <b>기존 워드프레스 사이트에 <span style="color: rgb(152, 0, 0);">'All-in-One WP Migration' 플러그인</span>을 <span style="color: rgb(71, 102, 0);">설치하고 활성화</span> 시킵니다.</b></p><p style="text-align: center; clear: none; float: none;"><br></p><p style="text-align: center; clear: none; float: none;"><span class="imageblock" style="width: 629px; height: auto; display: inline-block; max-width: 100%;"><img width="629" height="336" style="height: auto; max-width: 100%;" alt="백업 파일 만들기" src="http://cfile3.uf.tistory.com/image/232824415782B00A2F4E8F" filename="워드프레스 사이트 [백업, 복원, 이전] 4.jpg" filemime="image/jpeg" original="yes"></span></p><p style="text-align: center; clear: none; float: none;">4. <b>메뉴에 추가된 All-in-One WP Migration을 열어 <span style="color: rgb(255, 187, 0);">Export</span>를 클릭합니다.</b></p><p style="text-align: center; clear: none; float: none;"><br></p><p style="text-align: center; clear: none; float: none;"><span class="imageblock" style="width: 629px; height: auto; display: inline-block; max-width: 100%;"><img width="629" height="336" style="height: auto; max-width: 100%;" alt="사이트 백업 파일 저장하기" src="http://cfile22.uf.tistory.com/image/27211C415782B00E306CAA" filename="워드프레스 사이트 [백업, 복원, 이전] 5.jpg" filemime="image/jpeg" original="yes"></span></p><p style="text-align: center; clear: none; float: none;">5. <b><span style="color: rgb(152, 0, 0);">Export</span>는 현재 사이트를 통째로 백업하는 기능으로</b></p><p style="text-align: center; clear: none; float: none;"><b><span style="color: rgb(71, 102, 0);">워드프레스 사이트 이전이나 복원을 할 때 사용</span>할 수 있습니다.</b></p><p style="text-align: center; clear: none; float: none;">글과 댓글은 기본이며 플러그인 설정까지 하나도 빠뜨리지 않고 그대로 옮길 수 있습니다.</p><p style="text-align: center; clear: none; float: none;">사이트 백업 파일을 저장하는 방법은 파일, FTP, 드랍박스, 구글 드라이브 등 다양한 방법이 있지만,</p><p style="text-align: center; clear: none; float: none;"><b><span style="color: rgb(71, 102, 0);">무료 버전에서는 FILE만 가능</span>하므로 <span style="color: rgb(255, 187, 0);">EXPORT TO</span>를 클릭한 후 <span style="color: rgb(255, 187, 0);">FILE</span>을 클릭합니다.</b></p><p style="text-align: center; clear: none; float: none;"><br></p><p style="text-align: center; clear: none; float: none;"><span class="imageblock" style="width: 629px; height: auto; display: inline-block; max-width: 100%;"><img width="629" height="336" style="height: auto; max-width: 100%;" alt="사이트 옮기는 법" src="http://cfile25.uf.tistory.com/image/271594415782B01231070F" filename="워드프레스 사이트 [백업, 복원, 이전] 6.jpg" filemime="image/jpeg" original="yes"></span></p><p style="text-align: center; clear: none; float: none;">6. 위와 같이 진행 상황을 알려주는 창이 뜨며 워드프레스 사이트 백업이 진행됩니다.</p><p style="text-align: center; clear: none; float: none;"><br></p><p style="text-align: center; clear: none; float: none;"><span class="imageblock" style="width: 629px; height: auto; display: inline-block; max-width: 100%;"><img width="629" height="336" style="height: auto; max-width: 100%;" alt="사이트 복구하기" src="http://cfile30.uf.tistory.com/image/221E04475782BCB807D553" filename="워드프레스 사이트 [백업, 복원, 이전] 7.jpg" filemime="image/jpeg" original="yes"></span></p><p style="text-align: center; clear: none; float: none;">7. 백업 파일이 생성되면 위 그림과 같이 파일을 다운 받을 수 있는 창이 나타납니다.</p><p style="text-align: center; clear: none; float: none;"><b>초록색의 <span style="color: rgb(255, 187, 0);">DOWNLOAD</span> 버튼을 클릭한 후 <span style="color: rgb(71, 102, 0);">다운 받을 위치를 설정하고 저장</span>합니다.</b></p><p style="text-align: center; clear: none; float: none;"><br></p><p style="text-align: center; clear: none; float: none;"><span class="imageblock" style="width: 629px; height: auto; display: inline-block; max-width: 100%;"><img width="629" height="336" style="height: auto; max-width: 100%;" alt="사이트 복원하기" src="http://cfile23.uf.tistory.com/image/26176F465782B0222D7EA9" filename="워드프레스 사이트 [백업, 복원, 이전] 8.jpg" filemime="image/jpeg" original="yes"></span></p><p style="text-align: center; clear: none; float: none;">8. 내보내기(백업 파일 생성) 작업이 완료되었으면</p><p style="text-align: center; clear: none; float: none;"><b><span style="color: rgb(152, 0, 0);">이전받을 워드프레스 사이트</span>에도 <span style="color: rgb(71, 102, 0);">'All-in-One WP Migration' 플러그인을 설치</span>하고</b></p><p style="text-align: center; clear: none; float: none;"><b>생성된 메뉴 중에서<span style="color: rgb(255, 187, 0);"> Import</span>를 클릭합니다.</b></p><p style="text-align: center; clear: none; float: none;"><br></p><p style="text-align: center; clear: none; float: none;"><span class="imageblock" style="width: 629px; height: auto; display: inline-block; max-width: 100%;"><img width="629" height="336" style="height: auto; max-width: 100%;" alt="워드프레스 옮기기" src="http://cfile21.uf.tistory.com/image/27192B465782B0292D8E38" filename="워드프레스 사이트 [백업, 복원, 이전] 9.jpg" filemime="image/jpeg" original="yes"></span></p><p style="text-align: center; clear: none; float: none;">9.<b> <span style="color: rgb(255, 187, 0);">IMPORT FROM</span>을 클릭한 후 <span style="color: rgb(255, 187, 0);">FILE</span>을 클릭합니다.</b></p><p style="text-align: center; clear: none; float: none;"><b>그 후 <span style="color: rgb(71, 102, 0);">조금 전 다운 받았던 백업 파일을 찾아 업로드</span> 합니다.</b></p><p style="text-align: center; clear: none; float: none;"><strong><br></strong></p><p style="text-align: center; clear: none; float: none;"><strong><br></strong></p><p style="text-align: center; clear: none; float: none;"><strong>출처: <a href="http://money2015.tistory.com/638">http://money2015.tistory.com/638</a></strong></p><p style="text-align: center; clear: none; float: none;"><br></p><p style="text-align: center; clear: none; float: none;"><span class="imageblock" style="width: 629px; height: auto; display: inline-block; max-width: 100%;"><img width="629" height="336" style="height: auto; max-width: 100%;" alt="홈페이지 이사하기" src="http://cfile1.uf.tistory.com/image/221A97465782B02E2D4284" filename="워드프레스 사이트 [백업, 복원, 이전] 10.jpg" filemime="image/jpeg" original="yes"></span></p><p style="text-align: center; clear: none; float: none;">10. 파일 업로드가 끝나면 위 사진과 같은 알림 메시지가 나타납니다.</p><p style="text-align: center; clear: none; float: none;">메시지 내용은 다음과 같습니다.</p><p style="text-align: center; clear: none; float: none;"><br></p><p style="text-align: center; clear: none; float: none;"><i><span style="color: rgb(103, 0, 0);">"이 불러오기 과정은 당신의 데이터</span><span style="color: rgb(103, 0, 0);">베이스, 미디어, 플러그인 그리고 테마 파일을 덮어쓰기 합니다.</span></i></p><p style="text-align: center; clear: none; float: none;"><span style="color: rgb(103, 0, 0);"><i>CONTINUE를 누르기 전 현재 사이트의 데이터를 백업해주세요."</i></span></p><p style="text-align: center; clear: none; float: none;"><br></p><p style="text-align: center; clear: none; float: none;"><b>이전 사이트 내용을 이전해 올 것이므로 현재 사이트 백업은 불필요합니다.</b></p><p style="text-align: center; clear: none; float: none;"><b>그러므로 알림 메시지를 무시하고 <span style="color: rgb(255, 187, 0);">CONTINUE</span>를 클릭합니다.</b></p><p style="text-align: center; clear: none; float: none;"><br></p><p style="text-align: center; clear: none; float: none;"><span class="imageblock" style="width: 629px; height: auto; display: inline-block; max-width: 100%;"><img width="629" height="336" style="height: auto; max-width: 100%;" alt="워드프레스 사이트 복원 하기" src="http://cfile1.uf.tistory.com/image/21063D465782B0322E2EA9" filename="워드프레스 사이트 [백업, 복원, 이전] 11.jpg" filemime="image/jpeg" original="yes"></span></p><p style="text-align: center; clear: none; float: none;">11. 이전 사이트의 데이터가 모두 옮겨지면 위와 같은 알림 메시지가 나타납니다.</p><p style="text-align: center; clear: none; float: none;">메시지 내용은 다음과 같습니다.</p><p style="text-align: center; clear: none; float: none;"><br></p><p style="text-align: center; clear: none; float: none;"><i><span style="color: rgb(103, 0, 0);">"당신은 2가지 과정이 더 남았습니다.</span></i></p><p style="text-align: center; clear: none; float: none;"><i><span style="color: rgb(103, 0, 0);">1. 당신은 반드시 Permalink Structure(고유</span><span style="color: rgb(103, 0, 0);">주소)를 2번 저장 해야 합니다</span></i></p><p style="text-align: center; clear: none; float: none;"><i><span style="color: rgb(103, 0, 0);">2. 필요하다면 플러그인을 한 번 더 확인하세요"</span></i></p><p style="text-align: center; clear: none; float: none;"><br></p><p style="text-align: center; clear: none; float: none;"><b>2번은 굳이 할 필요가 없지만, 1번 <span style="color: rgb(152, 0, 0);">고유주소 저장</span>은 <span style="color: rgb(71, 102, 0);">반드시 해야지만 사이트를 완전히 이전시킬 수 있습니다.</span></b></p><p style="text-align: center; clear: none; float: none;"><b>그러므로 <span style="color: rgb(255, 187, 0);">Permalinks Settings</span>를 클릭해 고유주소를 설정하는 페이지로 이동합니다.</b></p><p style="text-align: center; clear: none; float: none;">이 과정에서 워드프레스에 재로그인하는 과정이 필요합니다.</p><p style="text-align: center; clear: none; float: none;"><br></p><p style="text-align: center; clear: none; float: none;"><span class="imageblock" style="width: 629px; height: auto; display: inline-block; max-width: 100%;"><img width="629" height="336" style="height: auto; max-width: 100%;" alt="워드프레스 사이트 백업하기" src="http://cfile28.uf.tistory.com/image/2510C9465782B0362EDCEB" filename="워드프레스 사이트 [백업, 복원, 이전] 12.jpg" filemime="image/jpeg" original="yes"></span></p><p style="text-align: center; clear: none; float: none;">12. <b>주의할 점은 이전 사이트의 모든 내용이 이전된 상태기 때문에</b></p><p style="text-align: center; clear: none; float: none;"><b>로그인할 때도 <span style="color: rgb(152, 0, 0);"><span style="color: rgb(71, 102, 0);">이전 사이트</span><span style="color: rgb(71, 102, 0);">에서 사용하던</span></span></b></p><p style="text-align: center; clear: none; float: none;"><b><span style="color: rgb(71, 102, 0);">아이디와 패스워드</span><span style="color: rgb(71, 102, 0);">를 사용</span>해야 합니다.</b></p><p style="text-align: center; clear: none; float: none;"><br></p><p style="text-align: center; clear: none; float: none;"><span class="imageblock" style="width: 629px; height: auto; display: inline-block; max-width: 100%;"><img width="629" height="336" style="height: auto; max-width: 100%;" alt="워드프레스 고유 주소 설정" src="http://cfile6.uf.tistory.com/image/240583465782B03A2F24CE" filename="워드프레스 사이트 [백업, 복원, 이전] 13.jpg" filemime="image/jpeg" original="yes"></span></p><p style="text-align: center; clear: none; float: none;">13. <b>로그인 후 고유주소 설정 창이 뜨면 스크롤을 내려 <span style="color: rgb(255, 187, 0);">변경 사항 저장</span>을 클릭 해줍니다.</b></p><p style="text-align: center; clear: none; float: none;"><b>저장이 완료되면 한 번 더 <span style="color: rgb(255, 187, 0);">변경 사항 저장</span>을 클릭해줍니다.</b></p><p style="text-align: center; clear: none; float: none;"><b><br></b></p><p style="text-align: center; clear: none; float: none;"><i>(만약 로그인 후 대시보드로 이동되었다면 <span style="color: rgb(255, 187, 0);">메뉴-설정-고유주소</span>를 클릭해 이동할 수 있습니다)</i></p><p style="text-align: center; clear: none; float: none;"><br></p><p style="text-align: center; clear: none; float: none;"><span class="imageblock" style="width: 629px; height: auto; display: inline-block; max-width: 100%;"><img width="629" height="336" style="height: auto; max-width: 100%;" alt="All-in-One WP Migration 플러그인" src="http://cfile1.uf.tistory.com/image/2312BB465782B03F2EEAD7" filename="워드프레스 사이트 [백업, 복원, 이전] 14.jpg" filemime="image/jpeg" original="yes"></span></p><p style="text-align: center; clear: none; float: none;">14. <b>위 사진과 같이 오류 없이 <span style="color: rgb(152, 0, 0);">'고유주소 구조가 업데이트되었습니다.'</span>라는 안내 문구가 뜨면</b></p><p style="text-align: center; clear: none; float: none;"><b><span style="color: rgb(71, 102, 0);">기존 워드프레스 사이트에서 새로운 워드프레스 사이트로의 이전이 성공적으로 끝난 것</span>을 뜻합니다.</b></p><div class="google-auto-placed ap_container" style="width: 100%; height: auto; text-align: center; clear: none;"><ins class="adsbygoogle adsbygoogle-noablate" style="margin: auto; display: block; background-color: transparent;" data-adsbygoogle-status="done" data-ad-client="ca-pub-8089307645737503" data-ad-format="auto"><ins id="aswift_3_expand" style="margin: 0px; padding: 0px; border: currentColor; border-image: none; width: 820px; height: 200px; display: inline-table; visibility: visible; position: relative; background-color: transparent;"><ins id="aswift_3_anchor" style="margin: 0px; padding: 0px; border: currentColor; border-image: none; width: 820px; height: 200px; display: block; visibility: visible; position: relative; background-color: transparent;"><iframe name="aswift_3" width="820" height="200" id="aswift_3" frameborder="0" marginwidth="0" marginheight="0" scrolling="no" vspace="0" hspace="0" allowfullscreen="true" style="left: 0px; top: 0px; width: 820px; height: 200px; position: absolute;" allowtransparency="true"></iframe></ins></ins></ins></div><p style="text-align: center; clear: none; float: none;">혹시라도 유료 플러그인을 사용하고 있었다면 설정이 그대로 유지되어있는지 확인해보는 것을 추천합니다.</p><p style="text-align: center; clear: none; float: none;"><br></p><p style="text-align: center; clear: none; float: none;"><span class="imageblock" style="width: 629px; height: auto; display: inline-block; max-width: 100%;"><img width="629" height="336" style="height: auto; max-width: 100%;" alt="워드프레스 홈페이지 옮기기" src="http://cfile1.uf.tistory.com/image/226577425782B0441092D1" filename="워드프레스 사이트 [백업, 복원, 이전] 15.jpg" filemime="image/jpeg" original="yes"></span></p><p style="text-align: center; clear: none; float: none;">15. 사이트 이전이 끝난 후 홈페이지로 이동해 보았습니다.</p><p style="text-align: center; clear: none; float: none;"><b>모든 자료와 플러그인이 완벽히 옮겨졌고 사이트도 정상적으로 작동합니다.</b></p><p style="text-align: center; clear: none; float: none;"><br></p><p style="text-align: center; clear: none; float: none;">- - - - </p><p style="text-align: center; clear: none; float: none;"><br></p><p style="text-align: center; clear: none; float: none;"><b>기존의 도메인을 새로 생성한 워드프레스 사이트로 옮기려면</b></p><p style="text-align: center; clear: none; float: none;"><b><span style="color: rgb(152, 0, 0);">도메인 네임주소</span>를 새로운 <span style="color: rgb(71, 102, 0);">워드프레스 호스팅 서버로 설정</span>해준 후</b></p><p style="text-align: center; clear: none; float: none;"><b><span style="color: rgb(255, 187, 0);">관리자 메뉴-설정-일반</span>을 클릭해</b></p><p style="text-align: center; clear: none; float: none;"><b><span style="color: rgb(152, 0, 0);">워드프레스 주소<span style="color: rgb(0, 0, 0);">와</span> 사이트 주소<span style="color: rgb(0, 0, 0);">를</span> <span style="color: rgb(71, 102, 0);">재설정</span></span><span style="color: rgb(71, 102, 0);"> </span>해주면 됩니다.</b></p><p style="text-align: center; clear: none; float: none;"><br></p><p style="text-align: center; clear: none; float: none;"></p><hr style="border-width: 1px 0px 0px; border-style: solid none none; border-color: black; border-image: none; height: 1px; display: block;"><p></p><p style="text-align: center; clear: none; float: none;"><br></p><p style="text-align: left; clear: none; float: none;"> <b>위와 같은 방법으로 <span style="color: rgb(152, 0, 0);">주기적으로 EXPORT 파일을 생성</span>해 저장해 놓으면 혹시라도 <span style="color: rgb(71, 102, 0);">워드프레스 사이트에 문제가 생겼을때 백업 파일을 이용해 어려움 없이 즉시 </span><span style="color: rgb(71, 102, 0);">복구</span>시킬 수 있습니다. </b>혹시라도 위 과정대로 진행하시다가 문제점이 생기거나 궁금한 점이 있다면 언제든 댓글 남겨주시면 성실히 답변해드리도록 하겠습니다. </p><p style="text-align: left; clear: none; float: none;"><br></p></div></div><br><br>출처: <a href="http://money2015.tistory.com/638"><u><font color="#0066cc">http://money2015.tistory.com/638</font></u></a> [큰일 할 남자]<br><br>출처: <a href="http://money2015.tistory.com/638"><u><font color="#0066cc">http://money2015.tistory.com/638</font></u></a> [큰일 할 남자]
알렉스 (_admin_)
2008-07-23
운영자 (1)
포인트 : 0 게시물 작성수 : 0 댓글 작성수 :


 뉴욕코리아정보광장


![워드프레스 사이트 [백업, 복원, 이전] 방법](http://cfile2.uf.tistory.com/image/261E68415782AFFD305378)


 트위터
트위터  페이스북
페이스북 


